Two questions you may be asking as a new homeschool mom are:
“How do I teach my child how to recognize letters and the sounds they make?” and “How do I teach my child how to properly write the letters?”
It can feel overwhelming to be the one responsible for teaching your children these concepts, but it’s amazing how easy it can be when you have a simple plan and few strategies in your pocket.
In this blog post I will explain letter recognition and letter formation, and share my favorite tips for teaching children.
In this blog post:
- What is letter recognition?
- What is letter formation?
- What age should I introduce children to letters?
- What order should children learn the alphabet in?
- Favorite hands-on alphabet recognition and formation activities
- Favorite early learning resources from Treehouse Schoolhouse
What is letter recognition?

Letter recognition is the ability to identify the letters in the alphabet in three ways.
- Recognition by name. This means when you point to a letter, the child can say the letter’s name.
- Recognition by shape. This means when you ask the child to find a letter based on its name, they are able to identify which letter is the correct one amongst a group of letters.
- Recognition by sound. This means when you say a letter sound, the child can tell you the name of the letter.
What is letter formation?

Letter formation is the ability to form letters of the alphabet. Before children use a pencil to form the letters, you can teach proper letter formation using sensory experiences and hands-on activities.
What age should I begin introducing children to letters?

In our home we don’t begin formal education until around 6 years old. Until then, we focus on things like lots of unstructured play, outside time, and building habits. That being said, if our children are curious about letters and eager to learn to write and read, I want to be ready to invite them into learning in a gentle way. “Invite” being the key word! We begin pointing out letters, playing with a moveable alphabet, and talking about them in an organic way as young as 1-2 years old. Everything we do for preschool and kindergarten is optional, developmentally appropriate, and hands-on. The goal is exposure, following their lead, and making learning fun!
If a child is eager to read, you can help them along by teaching them the sounds the letters make. The very best thing you can do is read aloud to them and track the words as you read. If they are eager to write, teaching them proper letter formation from a young age is extremely important, so that they don’t create habits in writing their letters the incorrect way and have to un-do those habits later on.
It isn’t until children are closer to age 5 or 6 that their finger muscles are developed enough to properly hold a pencil. Instead of spending your energy focusing on proper pencil grip, offer young children sensory experiences to explore letters. Young children were designed to be movers and shakers and the last thing we should do is expect them to sit still and hold a pencil to learn these things.
What order should children learn the alphabet in?

This question can be answered in many ways. I will share what we have done and seen success in our home.
First, we start only with recognition. We begin with the letters in our children’s names. These letters mean something to the child and so they are excited to learn them. I usually teach both uppercase and lowercase simultaneously, but many people choose to focus on uppercase first and then move to lowercase. I think it just depends on the child’s age and development. From there, I have used the order taught in the curriculum Handwriting Without Tears. Even before my children are using the workbooks with pencils, I use their methods for the order to introduce the letters.
Once I feel my children are ready to begin forming letters, we start with uppercase in the order that Handwriting Without Tears uses. Then we move to lowercase. Many times our experience has been that the children are so eager to learn that they ask to learn the uppercase and lowercase at the same time. They get so interested we breeze through the order or skip around because they ask to learn certain letters so they can write certain words. Often by the time we formally get to the letter, they’ve already learned it because they’ve asked. I recommend following your child’s lead, while also being intentional with teaching the proper formation.
Favorite hands-on alphabet recognition and formation activities
1. Alphabet Scavenger Hunt

Use an alphabet card to review the letter and sound it makes. Place it in a basket and have your child look around the house or outside for objects that begin with the same letter as the card.
2. Alphabet Card Find & Match

Use alphabet cards for your child to identify a specific letter in a group of letters. I like using cards that separate uppercase from lowercase so that we can start with only uppercase and add lowercase as they learn. I also like to use them to play matching games–matching uppercase to lowercase. I also recommend finding cards that use multiple letter sounds for the same letter (example short a as in apple and long a as in acorn). I designed the Wonder of Nature Alphabet Cards with these things in mind.
3. Texture Letter Tracing
Use sandpaper cards like these or make your own with white glue and glitter. Just be sure to follow the proper letter formation, using a chart like this. First model how to form the letter using your index finger and then an unsharpened pencil. Then, ask your child to repeat what you demonstrated.
4. Sensory Writing Tray

Use a cookie sheet or small wooden tray. Fill it with salt or another similar item like birdseed, sprinkles, or sand. Use a letter card for the child to look at as they form the letter. Model writing a letter in the tray using your index finger and verbally saying each step. Have your child lightly shake the tray to have a “clean slate” to write again.
5. White Erase Tracing

Dry erase markers are a great stepping stone before asking your child to hold a pencil correctly because they are thicker and easier to grip. Slip a sheet that properly outlines the letter into a dry erase pocket or menu cover. Model to your child how to form the letter using a dry erase marker and then give them a chance to try. Make sure to verbally say each step as you model. Even better, use a set like the Wonder of Nature Collection that includes sheets that teach the proper letter formation, step-by-step, and have dotted lines for your child to trace over.
6. Clay Forming

Give your child playdough or non-drying modeling clay and a card with the letter on it for them to refer to. They can roll pieces and shape them into the letter. We like to do this on top of an outline of the letter, like the ones in the Wonder of Nature Collection. As the place the clay, they are getting exposure to the letter and it’s name and shape.
7. Chalkboard Write and Wipe

This is a method used in the early years of the curriculum Handwriting Without Tears. Model the entire process first, then ask your child to repeat. First, write the letter on a small slate, using proper letter formation and verbally saying each step. Then, dip a little square sponge into water and squeeze the excess water out. Finally, erase the letter in the same way that it is written. My kids love it, the repetition is gold, and the pincer grasp gets a lot of work!
8. Three-Part Cards
Nomenclature cards, or 3-Part Cards, are simply images with corresponding labels. They help children learn beginning letter sounds as they match the words to the pictures.
Favorite early learning resources from Treehouse Schoolhouse
Are you looking for more learning resources for your homeschool? Consider these best-selling products from Treehouse Schoolhouse that offer a gentle invitation to learning.
Treehouse Story School: Preschool

Treehouse Story School: Preschool is 32-weeks of gentle, literature-based curriculum designed for ages 2.5-5 years. This preschool curriculum that invites children to learn through the themes in stories they love. Each week will focus on a picture book, inviting children into connection and learning through music and movement, play-based narration, alphabet and number play, motor skills, practical life development, crafts, and baking together.
It would be a great fit for your toddler or preschooler if you are looking to incorporate multi-sensory, play-based learning while introducing them to timeless stories.
From toddler through upper preschool, this curriculum can be used year after year as you dive deeper into beloved, classic stories your family will cherish. Preview a free week here.
Daily Rhythm Bundle
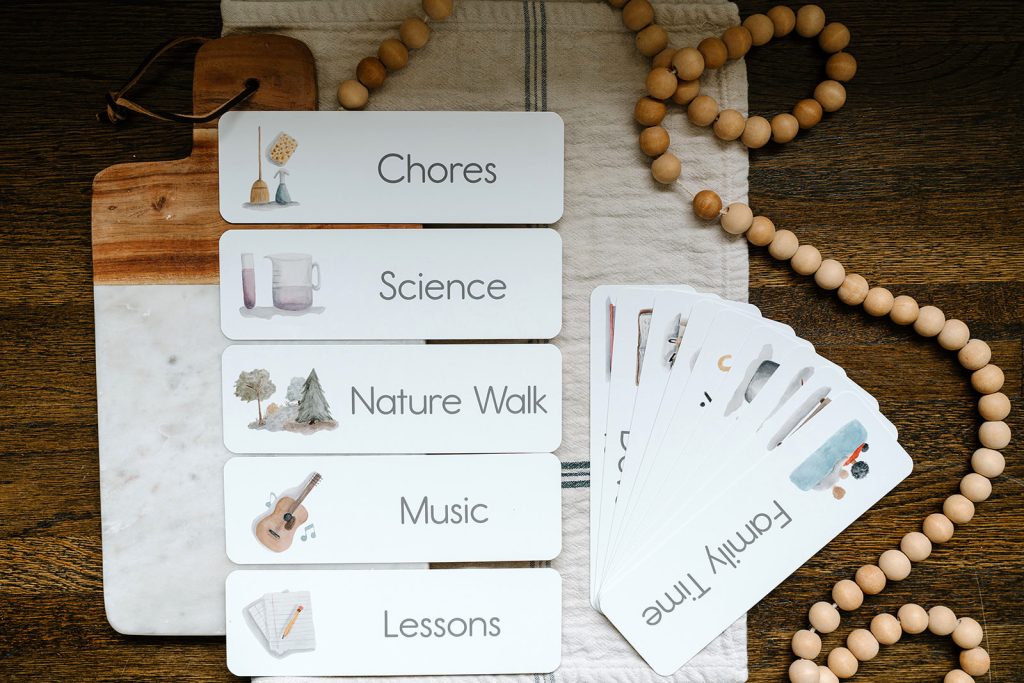
Children are highly visual–they can feel particularly out of control when they don’t know what to expect of their day. That’s why we recommend using a visual schedule to support your children from the time they are very young.
Rather than trying to stick to a rigid schedule, this set helps you create a general rhythm for your days. The daily rhythm worksheet is laminated and dry erase and the cards can be moved around offering you flexibility and adaptability.
Morning Time Bundle

This interactive, reusable set focuses on weather, seasons, moon phase, temperature, weather-appropriate clothing, date and time, and reading a calendar. With this daily bundle, your child will practice the skills of handwriting, tracing, copywork, and telling time. I recommend you print these materials and place them inside of a Morning Time Menu or dry-erase sleeve. Using dry-erase markers, your child can fill this bundle out over and over again.
We also offer a version of the Morning Time Bundle for those in our community who live in the Southern Hemisphere.


